Ago . 28, 2025 16:43 Voltar para a lista
Installing Drywall Corner Molding Step-by-Step Guide
Achieving crisp, durable, and professional-looking corners is essential for any high-quality drywall installation. Corners are inherently vulnerable to impacts, cracking, and wear. Utilizing specialized drywall corner molding is the industry-standard solution, providing vital reinforcement and creating a perfect guide for finishing compounds. This guide details the installation process for three common types of drywall corner molding: the Conta de ângulo de 15 mm, 15mm render bead, e 25mm upvc quadrant beading. As a leading manufacturer supplying these products in bulk, we provide this comprehensive overview to ensure optimal results for builders and contractors.
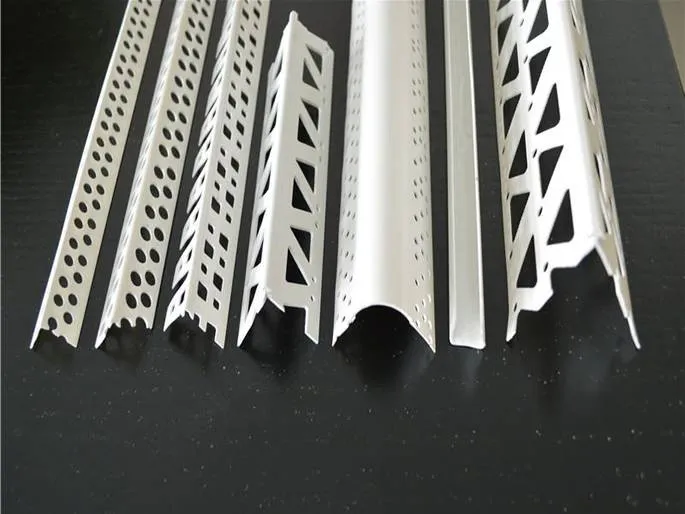
Understanding the Role of Drywall Corner Molding
Drywall corner molding serves two critical functions: protection and profiling. Drywall edges at corners are fragile and prone to damage from everyday knocks. These moldings act as a robust shield. Secondly, they create a distinct, straight edge that finishers apply joint compound against, ensuring a smooth, consistent transition and a visually perfect corner. The choice between types depends on the corner's location, angle, and the finishing material. Using the correct drywall corner molding significantly enhances the longevity and aesthetic appeal of the finished wall.
Installing the 15mm Angle Bead for Internal Sharp Corners
O Conta de ângulo de 15 mm, typically made from galvanized steel or durable PVC, is designed for reinforcing and finishing sharp 90-degree internal corners where drywall meets. Its V-shaped profile provides rigidity.
- Measure and Cut:Measure the corner height accurately. Cut the Conta de ângulo de 15 mm to length using tin snips (for metal) or a fine-tooth saw. Ensure a clean, square cut.
- Apply Adhesive:Apply a generous, continuous bead of high-quality drywall adhesive or specialized corner bead adhesive along both flanges of the bead. Some installers also apply a thin layer directly to the corner.
- Position andPress: Carefully align the Conta de ângulo de 15 mm over the drywall corner. Press it firmly into place along its entire length, ensuring it sits perfectly centered on the apex of the corner. The 15mm flanges provide ample surface area for adhesion and compound.
- Screw Option:While adhesive is often sufficient for PVC beads, galvanized steel Conta de ângulo de 15 mm can be additionally secured using corrosion-resistant drywall nails or screws driven through the perforations in the flanges, spaced approximately 300mm apart. Avoid over-driving and denting the bead.
- Embedding:Apply a first coat of joint compound over both flanges, forcing it through the perforations to lock the bead in place. Use a 100-150mm drywall knife, pulling firmly from the corner outward on each side to remove excess compound and ensure a smooth bed. Feather the edges well.
Applying the 15mm Render Bead for External Corners
O 15mm render bead, almost always galvanized steel with a mesh flange extension, is engineered for external corners that will receive a cementitious render or stucco finish. It handles the harsher conditions and provides a key for the render.
- Measure, Cut andFit: Measure the external corner. Cut the 15mm render bead using tin snips. Temporarily hold it in place to check fit. The mesh flanges should lie flat against the substrate.
- Mechanical Fixing:This bead relies primarily on mechanical fixing. Position the 15mm render bead perfectly on the corner apex. Use masonry nails or corrosion-resistant screws (for sheathing) driven through the holes in the metal bead's spine. Fixings should be spaced 200-300mm apart. Ensure the bead is straight and secure; tapping lightly with a hammer can help seat it.
- Mesh Integration:Ensure the mesh flanges are lying flat. When applying the base coat of render, work it thoroughly through the mesh, embedding it completely. This creates a strong mechanical bond between the render, the mesh, and the bead.
- Profiling:Use the rigid edge of the 15mm render bead as a guide for your straight edge or feather edge when applying and smoothing the render, guaranteeing a sharp, durable external corner.
Fitting 25mm UPVC Quadrant Beading for Decorative Rounded Corners
25mm upvc quadrant beading offers a solution for creating attractive, rounded internal corners or protecting vulnerable edges like those on plasterboard reveals. Its curved profile provides impact resistance and a smooth finish.
- Measure andCut: Measure the required length for the corner or edge. Cut the 25mm upvc quadrant beading using a fine-tooth saw or sharp utility knife for a clean, burr-free cut. A mitre box helps for accurate 45-degree cuts on external corners if needed.
- Adhesive Application:Apply a continuous bead of high-grab adhesive (suitable for PVC and plasterboard) along the back of the 25mm upvc quadrant beading, focusing on the center and edges. Avoid excessive adhesive near the outer lips to prevent squeeze-out.
- Positioning andSecuring: Press the 25mm upvc quadrant beading firmly onto the prepared corner. Ensure it sits evenly along its entire length. The 25mm radius provides a substantial protective curve. Hold in place with masking tape if necessary until the adhesive sets (follow adhesive manufacturer's time). Mechanical fixing is generally not required or recommended as it can crack the PVC.
- Finishing:Once the adhesive is fully cured, any small gaps between the 25mm upvc quadrant beading and the wall surface can be filled with a flexible decorator's caulk for a seamless finish before painting.
FAQs about Drywall Corner Molding
What is the primary purpose of using a 15mm angle bead?
The primary purpose of the Conta de ângulo de 15 mm is to reinforce and create a perfectly straight, durable finish on sharp 90-degree internal drywall corners. It protects the vulnerable drywall edge from damage and provides a guide for applying joint compound smoothly.
Can the 15mm render bead be used for internal drywall corners?
While primarily designed for external render applications, a galvanized steel 15mm render bead can technically be used internally on drywall. However, the Conta de ângulo de 15 mm is generally preferred internally for drywall as it's specifically designed for embedding in joint compound and is often easier to finish smoothly without the mesh.
Is the 25mm upvc quadrant beading suitable for external corners?
No, 25mm upvc quadrant beading is designed for internal use only. UV exposure and extreme weather conditions can degrade UPVC over time. For external rounded corners, specific external-grade PVC or pre-formed rendered bullnose corners should be used.
How do I ensure the drywall corner molding stays securely attached?
Security depends on the type: Conta de ângulo de 15 mm relies on adhesive and often supplementary nails/screws (metal) plus embedding in compound. 15mm render bead requires robust mechanical fixing into the substrate and embedding in the base coat render. 25mm upvc quadrant beading uses high-quality adhesive only; ensure surfaces are clean and use the correct adhesive for PVC and plasterboard/masonry.
Can all types of drywall corner molding be painted?
Yes, galvanized steel Conta de ângulo de 15 mm e 15mm render bead should be primed with a suitable metal primer before painting. 25mm upvc quadrant beading can be painted directly with paints formulated for plastic or PVC after cleaning; light sanding can improve adhesion. Ensure paints are compatible with the molding material and the environment.
Selecting and correctly installing the appropriate drywall corner molding – whether the internal Conta de ângulo de 15 mm, the external 15mm render bead, or the decorative 25mm upvc quadrant beading – is fundamental to achieving professional, long-lasting drywall and plastering results. Each type serves a distinct purpose based on the corner's location, angle, and finish. By following the manufacturer-recommended steps for measurement, cutting, fixing (adhesive or mechanical), and embedding/covering, contractors and builders can ensure corners are protected from damage, provide crisp visual lines, and withstand the test of time. As a bulk manufacturer, we emphasize the importance of using the right profile and correct installation techniques to maximize the performance and value of these essential building components.
Últimas notícias
-
Proper Installation Methods for Aluminum Floor Grating
NotíciasAug.28,2025
-
Metal Mesh Corner Bead Impact Protection Benefits
NotíciasAug.28,2025
-
Extending Lifespan of Heavy-Duty Channel Drain Covers
NotíciasAug.28,2025
-
Custom Shapes for Specialized Aluminium Plaster Beads
NotíciasAug.28,2025
-
Aluminium Walkway Mesh Providing Slip-Resistant Ventilation
NotíciasAug.28,2025
Nossa empresa possui excelentes designers de desenho de grades de aço CAD, que podem fornecer aos clientes um design de layout de grades de aço perfeito e atender melhor aos requisitos especiais dos clientes para produtos. Temos aderido ao princípio empresarial de "qualidade em primeiro lugar, cliente em primeiro lugar", com produtos de alta qualidade, preços razoáveis e o tempo de entrega mais rápido, oferecemos de todo o coração aos clientes uma gama completa de serviços! Bem-vindos, novos e antigos clientes para cooperar sinceramente e criar brilho juntos!
Contate-nos
BEM-VINDO À NOSSA EMPRESA!
Obrigado pelo seu interesse em nossos serviços! Se você tiver alguma dúvida ou quiser reservar um serviço, não hesite em nos contatar. Nossa equipe é dedicada a fornecer a você o mais alto nível de serviço e suporte, e estamos comprometidos em trabalhar com você para fazer do seu evento um sucesso.

E-mail de serviço

Telefone de serviço
Contate-nos
- Telefone: +86 +86 15733154345
- E-mail: sales@chengsenchina.com
- Endereço: B1213 GLOBAL CENTER, NO.226 ZHONGHUA NORTH STREET, SHIJIAHUANG, CHINA


